From two to ten pedals, the rule
is the same: keep it simple!
In this article we are going
to deal with pedal effects for electric guitar and how to arrange them
in a pedalboard.
This article is also adaptable to bass guitar.
We’ll concisely and clearly talk about pedal effects (also known as stompboxes) and pedalboards for electric guitar, presuming that readers already
know the differences among the various available pedal effects for guitar and bass players.
Let’s focus on some
simple and fundamental things.
In order to simplify their management, I like to subdivide effects,
including the pedal ones, in three big groups: dinamyc, esthetical, ambience/delay.
- Dynamic effects
As the name says, these are the ones that are related
with signal dynamics, even if
referred to a portion of the involved frequency range, affecting equalisation,
volume, gain, distortion, compression, etc.
- Esthetical effects
These are the ones that add a modulation to the sound, such as chorus, phaser, flanger, tremolo,
vibrato, rotary, etc. Envelope followers, auto-wahs and similar effects can be
considered somewhere in between dynamic and esthetic ones depending on the kind.
- Ambience/delay effects
These are the effects that are related with reflection and repeat of a sound, long
or short, from the shortest reverb to a long delay, with or without signal
tails modulation.
The list order used above for the described typologies
of effects represents a possible suggestion for their arrangement in our signal chain. So, we’ll start with the
dynamic effects, go on with the esthetic ones and finish our pedalboard with
reverb and delay. Actually these last can be positioned in several cases before
some modulations or in parallel with
them.
Distortion, Chorus and
Delay: in which order?
Let’s figure we have a classic pedal triplet: a distortion pedal, a chorus and an analogue
or digital delay, according to our taste and need. In this case the game is shortly
done; the most correct sequence is just the stated one:
- distortion ► chorus ► delay
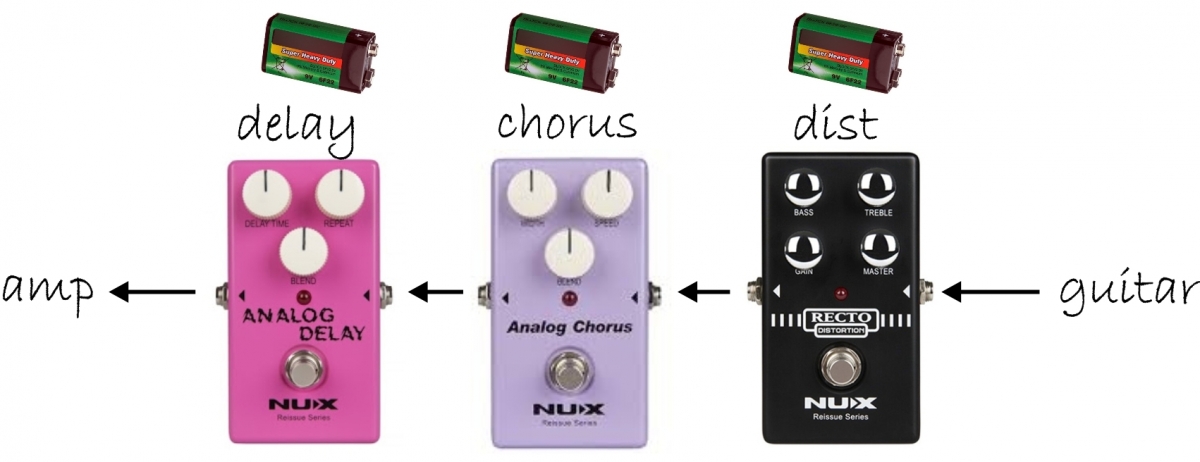
Nonetheless, it could be very interesting, and in several cases recommended,
to postpone the chorus to the delay. Such a situation is manageable without
involving a pedalboard nor a power
supply, simply connecting the three pedals one after the other using their inside
9V batteries.
Let’s assume we want to add a wah-wah or a volume pedal: for them both, the most suited position is before the distortion
effect. But, if you try to use the wah after distortion you’ll notice that the
sound changes, with a sweeter and more controllable result.
Effects power supply:
battery or external?
Well, until this point we could not need a pedalboard yet. The use of 9V
batteries is also avoiding potential noise problems due to outboard power
supply. We will carry our 3-4 stompboxes and maybe only plug the required ones according
to the situation. But if we do not intend to check the batteries’ status each
time, or if the delay is a digital tricky one that rapidly consumes its battery,
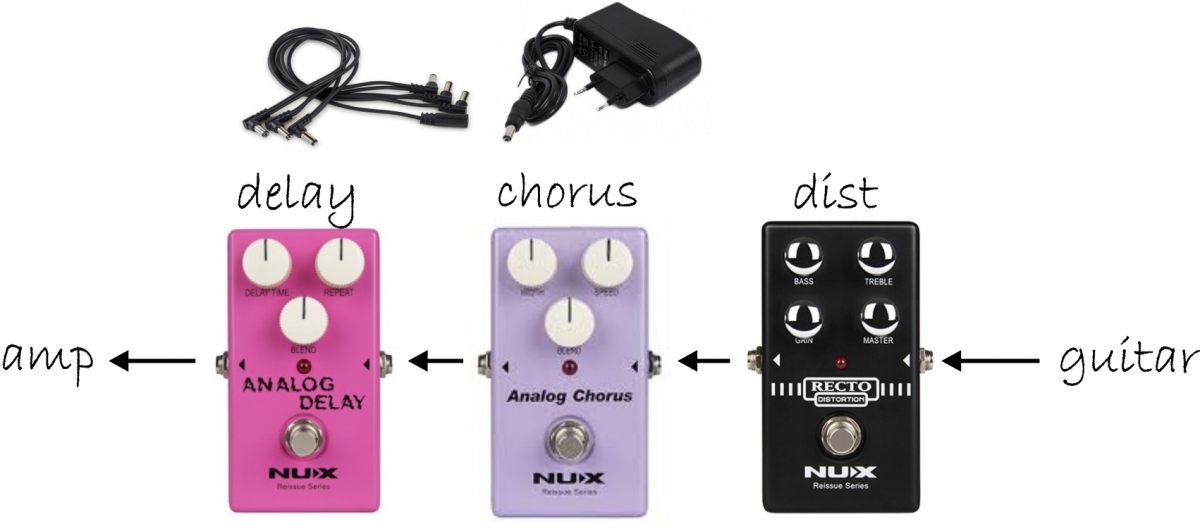
we will feel the need for an external
power supply.
We are still in the opportunity not to arrange the pedals in a pedalboard,
but simply adopt an adequate external power supply and equip it with a multiple cable usually called daisy chain. This one will feed current
to our 3-4 pedals and will be adequate as long as the range of total power
consumption will be reasonable, let’s say about 1 Ampère, for example.
Effect pedals: how do
we calculate their current requirements?
To calculate the current we need, just sum the absorption values, that
are given in milliAmpères (1 Ampère
= 1000 milliAmpères or mA). Let’s then choose a power supply that is capable of
an equal or 10% or more higher current than the estimated requirement.
Calculations aside, how do we realize that our pedals are getting less current
than requested from their battery or power supply? Technically, you could measure
the battery with a tester before your performance; banally, you’ll notice the indicators’
light is declining; more concretely, you’ll notice the sound quality is
lowering. Usually the clearest signs are a poor touch response, flat distortion,
confused delays. At this point I have to point out a fundamental fact related
to vintage pedals…
The sound of the
battery: Zinc-Carbon vs Alkaline
One of the most important items regarding the sounds of pedals, audible to the most
sensitive and trained ears, is their energy coming from a zinc-carbon battery, the older one, since its conception dates back
to the end of the 19th century. It is rich in defects and
efficiency variables (not only) due to the unavoidable
decrease in voltage between the poles through time. Nonetheless some guitarists’
beloved sounds are actually due to 9 Volts zinc-carbon batteries, proof is that
famous musicians (Eric Johnson firstly) favour their use and some builders make
external power supplies that actually are batteries assemblies.
A certain tone and dynamic smoothness,
some frequencies veiling that made history in old rock records, often are the signs
of a zinc-carbon battery at work, maybe somewhat low and under stress. Therefore,
an external power supply it is not necessarily the most effective from the
sound point view, though very practical.
For example, if we are using just a compressor, an overdrive and a
delay, we should not be afraid of using a zinc-carbon battery for the first and
second pedal, and an alkaline one for the third one. Always remember that
alkaline batteries – as opposed to zinc-carbon ones – ensure a constant voltage
until the complete and usually sudden collapse.
Pedalboards on the GAS
I know a lot of guitar players, mostly old-school ones, that love to go
around with a bag or a pedal case,
batteries and/or a power supply, using what is needed on each occasion. From
last decade a demand has been spreading for having all of the pedal effects
assembled, lined up, powered and ready to use on a pedalboard; sometimes this
is more of a hedonistic than true exigency. Well, let us transfer our 3-4 pedals on
a pedalboard.
I am not going to rest on pedalboards in this article; there is plenty, they
are all similar and do the same thing: to hold our effects in a steady, neat
and easy to carry way. Some of them are equipped with a built-in power supply;
this is a good solution if we are equally stable in picking our effects and
sure enough that that power supply will respond to our needs for a long time.

Premise 1
When choosing your pedal effects, always remember that
historic sounds, the ones that
hundreds of thousands or millions copies selling records made famous, are
almost always the products of simple pedals, the progenitors, in short the usual suspects: Ibanez TubeScreamer, Electro-Harmonix
Big Muff Pi, Boss DS-1 and CE-1, Shin-ei Uni-Vibe, Dallas-Arbiter
Fuzz Face, Wah Wah Vox, MXR Dyna Comp and a few others. These
effects are often based on electronics guide circuits, and there are countless
replicas, reissues and variations the market offers at competitive prices, beside
the expensive so-called boutique models.
Keep in mind this fact when marketing mermaids lure you from one side of the WEB
to the other.
Let’s also consider a very important difference: what
sounds good in our little room doesn’t always sound similarly good in a
rehearsal or studio room, when playing or recording with drums, bass, maybe
voice and keyboards too. Sometimes a straight mid to hi frequencies focused
sound is preferable to the pervasive creamy mid to low sound that we appreciate
in the silence of our home studio. More about this, the spiky edge of a fuzz or
some hiss excess can be lost among
the high frequencies of our band and create no annoyance (attention please: we
are not talking about hum, that’s
irremediably disturbing!).
Premise 2
Personally, I am today an old-school guitar player, as well as I was,
for the very same reason, a modern player in the ’90s: I used and still use to
connect delay and reverb effects in the effect
loop of the amplifier. Infact, from a logical point of view, I think that delays
and ambience should take action after any possible signal sound processing, as
it happens in nature, and should be provided
by a quality multieffect
with high AD/DA specs (it doesn’t matter if it’s a floor standing or a rack
mounted one). That said, when it is necessary, I connect my delay and reverb effects
in my pedalboard, being aware that their sound will be dirtied by the preamp stage that follows.
Compressor, volume pedal,
modulations and ambience... The effect chain get longer.
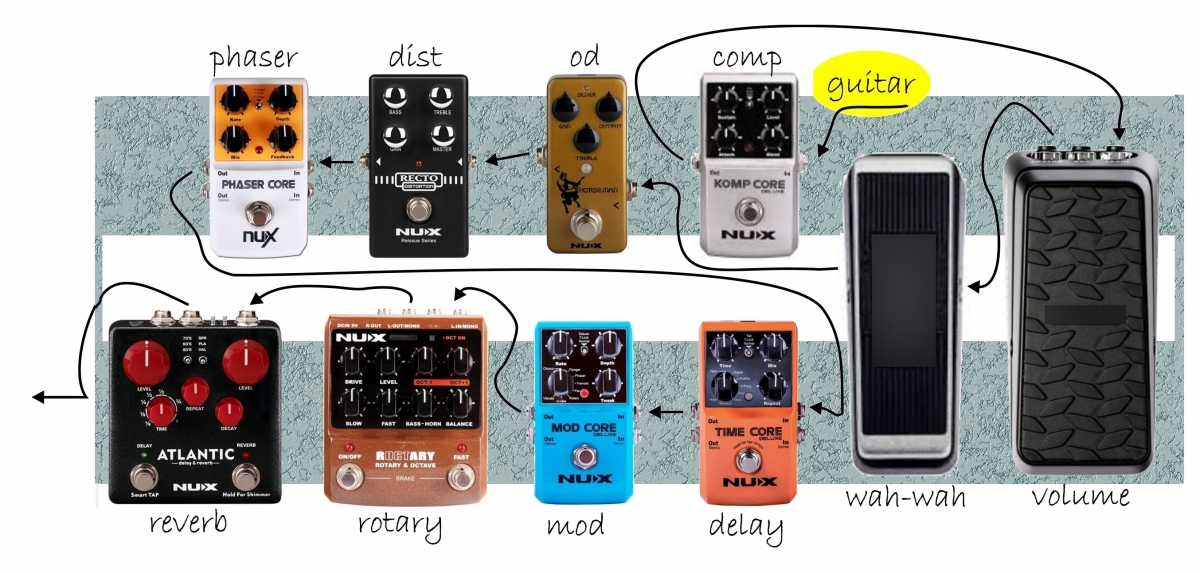
Our 3 starting pedals have increased in number. Now we have, for example:
volume pedal, wah-wah pedal, compressor, overdrive, distortion (maybe a metal one), phaser, tremolo/vibrato, chorus, delay, reverb. The compressor has the bad habit of amplifying noise
coming from previous effects, so it is commonly placed at the very beginning of
the pedal chain; but it is also possible to put it after the volume pedal. Provided
that trial is always a good practice, the recommended sequence of these effects
is:
- compressor ► volume pedal ► wah pedal ► overdrive ► distortion ► phaser
and so far we are in the scope of a time-linear signal,
though modulated by the phaser.
Starting from the chorus we enter the world of delays, since modulations
such as chorus and flanger imply the application of a very short delay to the
input signal. There are two easy ways:
- modulation - delay: modulations are repeated by the delay.
The result is cleaner and more clinical.
- delay - modulation: modulations are applied to delays.
The result is thicker and mellow.
Tremolo, vibrato and rotary
There is an effect block that is not exactly included
in the previous description: tremolo,
vibrato and Leslie simulations (analogue or
digital) more or less related to the Uni-Vibe. Let’s see a few definitions:
- tremolo: it is a volume variation
- vibrato: it is a pitch
(frequency) variation (yes, Fender has always been wrong writing ‘Synchronized Tremolo’ on Stratocasters
headstocks and some amps too, but Leo Fender was a great technician, not a
classical musician, so we forgive him)
- Leslie or rotary and similar: the famous amplifier with a rotating engine
was designed for Hammond organs to simulate the rich sound of a pipe organ
in the reverberating environment of a church; so it had to make its basic
sound more complex by means of delays and modulations both in frequency
and in amplitude. This is what Leslie inspired pedals should do, from
analogue emulations to digital simulations. Being not exactly a chorus nor
a vibrato nor an eco as we see them today, their position in the
pedalboard must be reasoned and chosen on a personal musical taste basis; anyway, surely towards the end of the
signal chain. Do your own tests!
Multiple effect pedals
To save some space and better organize the pedalboard, it is possible to
use double or multiple function pedals:
for example, reverb+delay or booster+compressor or a
single pedal with all the modulations; some of them also make possible to change the position of single
internal effects in the chain and put it in
series or in parallel. If we are
not uncompromising about a single kind of effect, multiple pedals can represent
a very practical solution!
The tuner
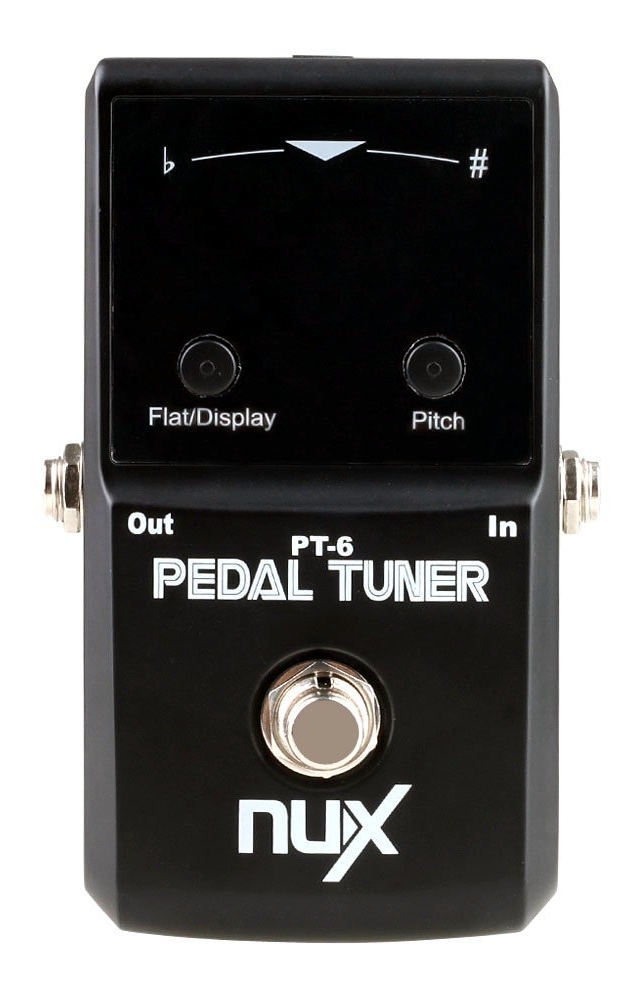
Personally, I like to assign a space for my tuner on the pedalboard, though many
guitar players today prefer to use a headstock mounted mini-tuner and save space
for other pedals. There’s plenty of models, not all true-bypass and not all equipped with a good internal buffer. If we are going to place a
tuner in our pedalboard, let’s choose a true-bypass model with Mute function (signal is muted while
tuning); we can place it at the beginning of the chain or immediately after a
buffered pedal: tuning display could be more stable. Needless to say, prefer a
big display with suitable brightness, but without excess, because some models
are really dazzling.
The booster
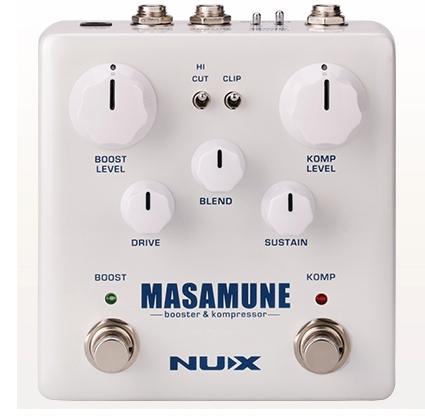
Another important piece of our effect chain is the booster, whom I deal with in the tail of the article because its function is
often fulfilled by an overdrive or a compressor with the gain or compression levels
kept at the minimum (or something higher according to taste) and the output levels
kept higher than unity step. Anyway its place is before any other effect, thus avoiding
to enhance, besides the instrument signal, noise that is eventually generated by
other pedals. Connecting a booster and a compressor can be a critical match, so
let’s choose the best booster we can afford. Some compressors provide a useful
adjustable noise reduction. Nux produces an amazing booster/compressor in a
single stompbox with variable routing and
mix of the effects!
Series, parallel and other complications
There is a complex pedalboard solution, which is the placement of delay
based effects in a series/parallel signal
path, by the way brilliantly offered in some integrated pedals. We will see
this topic in a distinct article; we’ll also talk about loop equipped pedalboards
and some technical issues you cannot ignore if you have a lot of effects and professional
performance demands: input/output impedance, buffers, more on power supply, different
kinds of bypass and more.
Fabrizio Dadò
Reference
