In this episode, the second of three dedicated to choosing the right microphone, we take a look at microphones for live performance. We will guide you through a variety of types and models, making a critical examination based on the application, whilst keeping the usual simple and practical approach. Ready? To the stage!
In the previous chapter we saw how to choose a microphone - or multiple microphones - for use in recording or broadcast. These processes ordinarily take place in environments that are designed for the sole purpose of recording, therefore making them more suitable for the use of a variety of microphones.
In this episode, we will focus on the choices to be made in a live environment, for the capture of instruments (either electric or acoustic) on a stage.
Whether it is a large stage of 100 square meters, or a 4 x 3 metre platform, we will almost definitely have to deal with similar problems and solutions. Here, there are a number of “limitations" that we don't often find in recording studios.
The stage is not an “ideal” environment:
If in the previous article we ascertained that the studio is, in many respects, a perfect environment - with a design that allows for flexibility in microphone placement and choice of microphone. The same cannot be said for the live environment.
Firstly, the stage is often in an outdoor environment, one very different from a temperature and humidity controlled recording studio (as all well-designed recording studios should be).
A second defining characteristic is that on a stage, especially in the smaller ones found in your typical pub or club, the band and the musicians play extremely close together. Because of this, the sound pressure of one instrument can easily "re-enter" into other microphones placed nearby, creating the typical "spill" effect. What is this "spill effect"? Think back to a gig where the sound of the snare drum rudely spills into the microphone of the lead singer. I'm sure many of you have had to deal with this long-standing problem, and this is what we mean by spill. This is an effect that, in some cases, can also be exploited to your advantage - a typical case being one where the whole of the drum kit is encouraged into the microphones above the kit - the overheads.
Some rules are always valid...
When mic-ing instruments on a stage, there is a rule that nearly always applies (perhaps with the exception of particularly large stages where musicians play with in-ear-monitors). This rule is that it’s essential to find a healthy balance between all the instruments and how they sound on stage. This typically means starting with the drums, and more precisely the snare, as this is often the level that we have least control over. We will then have to balance the sound of the bass amplifier, guitars and any other acoustic or electrified sources so that, at a first listen, the mix is balanced. After this we can think about the next phase, deciding what to amplify and how. This is where our choice of microphones comes in - a decision that relies on a few facts and theories.
Polar diagrams - where most of the challenges are found...
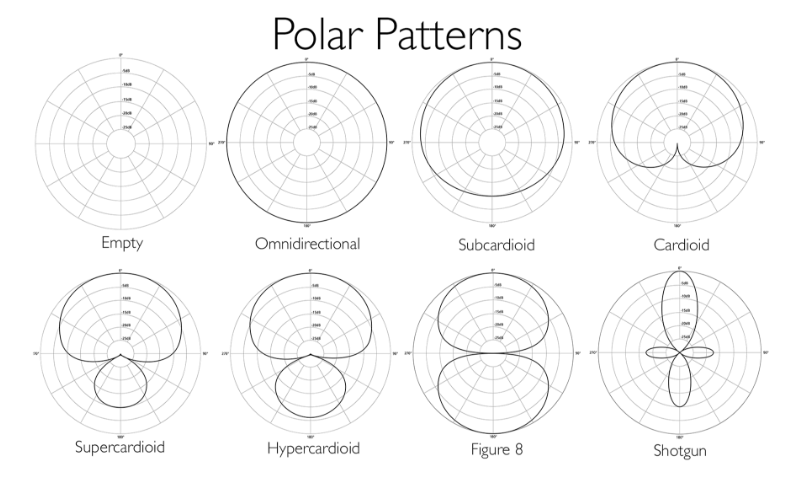
When working live, it is even more important than when in the studio to choose a microphone with an appropriate polar pattern for the application. Those who have studied in this area will know that there are several polar diagrams, with varying degrees of directionality, starting from the omnidirectional (which captures sound pressure from roughly 360° of entry) down to the hypercardioid. There are then, of course, all of the intermediate variants, namely the cardioid and the supercardioid. We have the famous shotgun microphones, which have an even greater level of directivity, but which have quite particular applications and are not necessarily appropriate in this context.
On the basis of what we have said so far, we could be led to think that the best solution is always to use very selective microphones - so as not to pick up other unwanted sources nearby and to avoid "dirtying" the sound. Unfortunately, it is just not that simple. It is true that when we want to isolate a sound as much as possible, we resort to a selective mic with a super or hypercardioid diagram. However, this choice always comes with compromises.

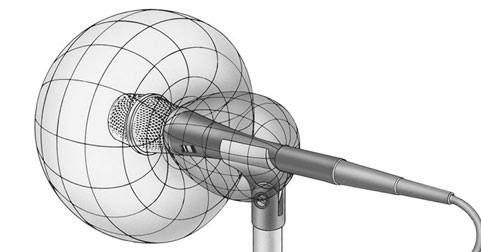
Microphones with very tight polar patterns often tend to lose much of the sound components of an instrument, precisely because it is only able to capture a part of the sound waves produced by the instrument. As we know, these sound waves propagate in the air in spherical waves, each at their own particular frequency. Additionally, in order to tighten the diagram from the front, these microphones often create another small lobe to the rear of the capsule, which means that a certain percentage of the sound coming from the area opposite the capsule also are also picked up.
This can generate many inconveniences, especially if there are monitors on a stage placed right in front of the musician. The attached image will clarify this concept.

Condensers, dynamics, delicacy and care!
We have also learned that microphones differ from each other depending on the technology used - whether it be condenser, dynamic or ribbon. If you haven't read the first article, do so now! (FIRST ARTICLE LINK)
One of the warnings that we often hear in this area is the presumed greater delicacy of condenser microphones compared to dynamic ones. This is even more true when it comes to ribbon microphones, as delicate as they are beautifully linear. Although it is undeniable that a condenser microphone is structurally more delicate (and a ribbon microphone even more so), it is also true that many manufacturers have created robust and reliable microphones in this area. Rather than focussing on “delicate handling”, the suggestion is to pay close attention to the maintenance of the microphones themselves, regardless of the type. The bitter enemies of these more delicate membranes are water, humidity and dust. Therefore, the careful use of our equipment on stage can greatly extend its lifespan.
- Never leave the microphone on a stand for longer than necessary. During the de-rig, the microphones are the first to be stored, so as to prevent damage before getting to the safety of their cases.
- Use a foam pop-shield for microphones in contact with singers. Whilst not stopping the sound, it does reduce the amount of moisture and general dirt entering the microphone.
- Purchase a good quality case, which includes somewhere to hold tools or pliers needed to secure the microphone to stands or other hardware.
These little tricks will help to prevent you from damaging your microphones. Moreover, the difference in sound performance between a microphone in good health and one that is "run down" is something that has to be heard to be believed.
But which microphones do I need, and how many?
As opposed to in the studio where we could theoretically meet our needs with one or two microphones (for a stereo shot), it is clear that in order to mic up a classic rock band live, which might consist of 4 or 5 musicians, we would need to consider using a higher number of microphones.
Typically, dynamics for the vocals are the essential first pick. Next, a drum kit set consisting of at least one kick-mic, a "tough" dynamic microphone for snare and two overheads (very often two condensers). Then, if necessary, we may need a few more microphones for guitar cabs, again always dynamic. In short, even in this case and having to give numbers, we would need to recommend a minimum of at least 5 microphones.
However, in the context of live performances, wireless systems are very often taken into consideration (we have already talked about it in a past article), a choice which is nonsensical in the recording studio. Additionally, if your guitarists pay an obsessive level of attention to their sound, it may be that a combination of two microphones on their cabinet is necessary to satisfy their requirements...
Ready to choose?
The market is full of brands and models, with a price range that, even in this case, can range from tens of euros, to thousands of euros for some rare and esoteric vintage microphones.
At this point, however, we feel compelled to make an approximation, precisely in view of the choices we are going to make. We want to avoid throwing money at products that are not always as useful as they may first seem. In fact, in a live context, the difference between a good condenser microphone and a 5000 euro high-end microphone is not as evident as in the studio. In this sense, a good 400-500 euro condenser would be plenty for the application, so we advise leaving the 5000 euro ribbon microphones safe and sound in the warm studio, away from the clumsy hands of the live musician.
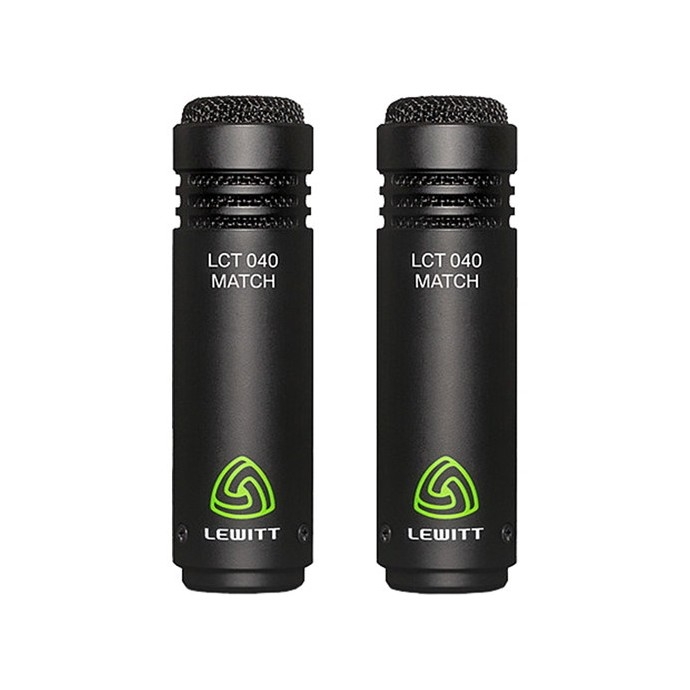
A small example of this? This Lewitt pair, with a narrow capsule, costs around 200 euros and can be perfect for overhead and stereo capture in general.

We would always encourage you to evaluate brands and products. As we have already specified in the previous article, the search for less "famous" brands and alternatives can return unexpected surprises. Let the "brand fanatics" make their own choices and don’t be influenced too much in this sense. Instead, choose a microphone
based on your real needs, and look for:
- At least one pair of condensers (checking that they are fairly robust
and resistant to transients)
- A basic kit of drum mics, as this can make a big difference
- At least two dynamic microphones (those under 100 euros wil be just
fine!)
Once this basic setup has been completed, it may be a good idea to also invest in one or two wireless microphones, so as to have an alternative for singers who like to move around on stage. Here, however, the value for money must be carefully evaluated because, as we said in a past article, many of the systems on the market do not differ so much under different brands and labels ...
Ok, so this time around we are encouraging you to spend a few euros more than before. However, if you really want to get worthy results in your performances, it is an effort that is worth making, perhaps using the hard-earned money first made by the bands (if they are lucky enough to be getting paid for their first gigs!).
Provided by https://www.encoreagency.net/
